原文地址: https://hackingcpp.com/cpp/libs/fmt.html
前言
Formatting & Print 库 (fmt库)是一个可以高效且安全地将 C 标准输入输出库转化为 C++ 输入输出流的现代 C++ 库(C++20 出现, C++23 加入标准库)
相比之前废拉不堪的输入输出函数, Formatting & Print 库 有如下特性:
由于目前大多数编译器并没有实现对 C++23 中 print 库的支持, 我们依然使用 C++20 的 fmt 库演示格式化与输出操作
PTA 的 C++ 编译器为 gcc 11.4.0, 只支持到 C++17, 所以在 PTA 平台上用不了这么好用的东西
前期准备
由于 fmt 库不存在于 C++20 的标准库中, 所以我们要手动引入
VSCode with mingw
首先, 删除.vscode配置文件, 在 IDE 界面按下 F5 查看 VSCode 使用的编译器的路径
在任意空文件夹下运行下面的 git 命令获取 fmt 库
git clone https://github.com/fmtlib/fmt.git
将获取到的代码中, 路径...\include\下的fmt\文件夹整个复制到编译器的库文件夹中, 对于我的配置来说, 路径是 C:\mingw64\lib\gcc\x86_64-w64-mingw32\13.1.0\include\c++\
完成上述步骤后, 安装 fmt 库就完成了, 其他系统或编译器请参考: https://hackingcpp.com/cpp/libs/fmt.html
假如你的 Windows 额外安装了 VS, 那么你的 VSCode 的 C/C++ 配置很可能将 IntelliSense 的路径设置在了 VS 的 C++ 编译器, 导致在使用 fmt 的时候, VSCode 仍然提示错误波形曲线(然而并不影响编译运行)
可以在 C/C++ 配置中修改编译器为你常用的编译器
头文件
在代码前添加以下内容即可使用 fmt 库
#define FMT_HEADER_ONLY #include <fmt/core.h>
总览
fmt 库最主要的两个函数是 fmt::format() 和 fmt::print()
fmt::format() 用于格式化的构造一个字符串并返回
auto formattedString_1 = fmt::format("Vanadium\n" );auto formattedString_2 = fmt::format("{} years old\n" , 24 );auto formattedString_3 = fmt::format("is a {}\n" , "student" );std::cout<<formattedString_1<<formattedString_2<<formattedString_3;
fmt::print()
fmt::print() 用于格式化的构造字符串并按规则输出
fmt::print ("Hello, {}\n" , "world" ); fmt::print ("ERROR {} / {}" , 404 , 403 );
构造规则
可以发现, fmt 库两个最重要的函数的共同点就是格式化的构造一个字符串, 因此我们来讨论控制字符串格式的方式
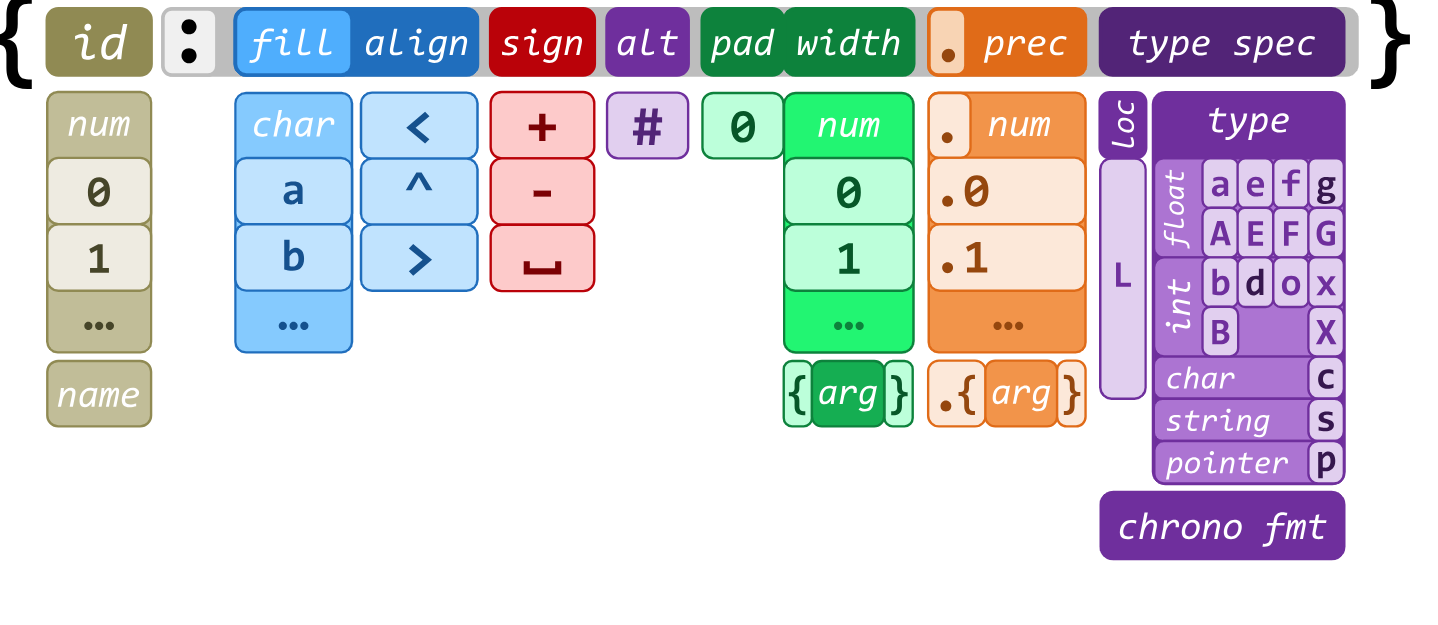
我们可以用以下的结构描述格式控制规则
id: 占位符的唯一标志
fill: 填充符
align: 靠左 / 靠右 / 居中
sign: 对于数字的符号
alt: 特殊控制
pad: 内边距
width: 宽度
prec: 保留小数位数
id
id 表示占位符向参数表的一个映射
int a, b, c;a = 1 , b = 2 , c =3 ; fmt::print ("{1}, {1}, {0}, {2}" , a, b, c);
导入 fmt/format.h 库后, 可以利用函数 fmt::arg() 绑定 id 和内容
#include <fmt/format.h> fmt::print ("S = {pi} * {radius} * {radius}\n" , fmt::arg ("pi" , 3.14 ), fmt::arg ("radius" , 6 ) );
fill & align & width
width 用于控制输出内容的宽度, 单位为字符数, 其中缺少的字符由 fill (默认为’ ') 填充, 所输出的字符居于的位置由 align 控制, 默认为居左
char str[] = "Vagrant" ;fmt::print ("|{:10}|\n" , str); fmt::print ("------------\n" ); fmt::print ("|{:*^10}|\n" , str); fmt::print ("------------\n" ); fmt::print ("|{:#>10}|\n" , str); fmt::print ("------------\n" );
使用 fill 控制填充符的时候, 一定要使用 align 显式规定居于的位置, 否则会引发错误
Argument-Determined Width & Cut Width
fmt 支持参数化的控制输出内容的宽度和保留位数
char str[] = "ABCD" ;std::vector<int > vec{1 , 2 , 3 }; for (auto i:vec){ fmt::print ("{:-<{}.{}}\n" , str, 5 - i, i); }
fmt 不会自动切割输出内容以适应宽度, 需要使用 cut width 进行控制
类型特化
下面对于特定类型介绍一些输出或格式化方式
有符号数
有符号数可以用 sign 控制符控制符号的展示方式
+: 总是输出符号
-: 当且仅当负数输出符号(default)
(空格): 当且仅当负数输出符号, 但是为正数留出空格适应宽度
#include <fmt/format.h> auto positive = 12 ;auto zero = 0 ;auto negative = -11.5 ;
fmt::print ("{:-<+5}\n" , positive); fmt::print ("{:-<+5}\n" , zero); fmt::print ("{:-<+5}\n" , negative); fmt::print ("-----\n" );
fmt::print ("{:-<-5}\n" , positive); fmt::print ("{:-<-5}\n" , zero); fmt::print ("{:-<-5}\n" , negative); fmt::print ("-----\n" );
fmt::print ("{:-< 5}\n" , positive); fmt::print ("{:-< 5}\n" , zero); fmt::print ("{:-< 5}\n" , negative); fmt::print ("-----\n" );
此外, 有符号数可以用 alt 转换特殊进制的输出方式
auto num = 20 ;auto width = 8 ;fmt::print ("{:>#{}x}\n" , num, width); fmt::print ("{:>{}x}\n" , num, width); fmt::print ("{:>#{}o}\n" , num, width); fmt::print ("{:>{}o}\n" , num, width); fmt::print ("{:>#{}b}\n" , num, width); fmt::print ("{:>{}b}\n" , num, width);
浮点数
利用 e / E 可以用科学计数法输出浮点数; f / F 表示以固定位数输出浮点数, 同时支持 INF
double data = 123.456 , INF = 1.0 / 0 ;fmt::print ("{:e}\n" , data); fmt::print ("{:E}\n" , data); fmt::print ("{:f}\n" , data); fmt::print ("{:f}\n" , INF); fmt::print ("{:F}\n" , INF);
fmt 支持以十六进制输出浮点数
fmt::print ("{:a}\n" , data); fmt::print ("{:A}\n" , data);
C++ 采用 IEEE754 标准表示浮点数, 即
上文中, data 表示为 IEEE754 标准即为(其中浮点数码用十六进制表示):
0 00000000110 EDD2F1A9FBE77
指针
利用 fmt 格式化输出指针需要利用 fmt::ptr() 函数将指针转化为可被识别的类型
#include <fmt/format.h> int n = 1 ;auto const p = fmt::ptr (&n);fmt::print ("{:p}\n" , p); fmt::print ("{:p}\n" , fmt::ptr (&n));
STL 容器
fmt 可以很方便的输出 STL 容器
#include <fmt/ranges.h> std::vector<int > vec{1 , 3 , 5 , 7 }; fmt::print ("|{}|\n" , vec); std::tuple<int , char , double > tup{4 , 'C' , 6.6 }; fmt::print ("|{}|\n" , tup); std::map<int , char > map{{2 , 'H' }, {6 , 'P' }, {4 , 'M' }}; fmt::print ("|{}|\n" , map); std::set<int > set{1 , 6 , 2 , 9 , 7 , 0 , -6 }; fmt::print ("|{}|\n" , set);
yysy, 这整的也太像 Python 了
当然, 很多时候我们并不希望输出奇怪的 list 的框, tuple 的括号, dictionary 的花括号, fmt 为我们提供了 fmt::join() 函数联结容器和分隔符
std::set<int > set{1 , 6 , 2 , 9 , 7 , 0 , -6 }; fmt::print ("|{:2> }|\n" , fmt::join (set, "#" ));
var_set = set ([1 , 6 , 2 , 9 , 7 , 0 , -6 ]) print (var_set)print ("#" .join(map (str , var_set)))
这样更像 Python 了, (叹气
使用 fmt::join() 后, {} 中的格式控制符会依次施加到每一个元素上
自定义
fmt 对自定义类型和容器的输出和格式化均有支持
自定义类型
这一段是直接搬运自原文的, 因为我试图运行原文提供的代码发现报错, 怀疑原因是新版本的 fmt 修改了对自定义类型格式化输出的逻辑(要求必定调用 fmt::formatter())
#include <fmt/ostream.h> struct point2d { int x; int y; point2d (int x_, int y_): x (x_), y (y_) {} friend std::ostream& operator << (std::ostream& os, point2d const & p) { return os << '(' << p.x << ',' << p.y << ')' ; } }; std::string s = fmt::format("Position is {}" , point2d{7 ,9 });
经过测试 , 我们需要通过定义 fmt::formatter() 函数才能格式化输出我们自定义类型
#define FMT_HEADER_ONLY #include <fmt/core.h> #include <fmt/ranges.h> #include <iostream> #include <fmt/format.h> struct Point { double x, y; }; template <>class fmt ::formatter<Point>{ char preStyle = 'f' ; public : constexpr auto parse (format_parse_context& ctx) auto i = ctx.begin (), end = ctx.end (); if (i != end && (*i == 'f' || *i == 'e' )){ preStyle = *i++; } if (i != end && *i != '}' ){ throw format_error("Invalid Format" ); } return i; } template <typename FmtCtx> constexpr auto format (Point const & point, FmtCtx& ctx) const { switch (preStyle){ default : case 'f' : return format_to(ctx.out (), "({:f}, {:f})" , point.x, point.y); case 'e' : return format_to(ctx.out (), "({:e}, {:e})" , point.x, point.y); } } }; int main () Point point{2.3 , 3.4 }; fmt::print ("{}\n" , point); fmt::print ("{:f}\n" , point); fmt::print ("{:e}\n" , point); }
在这个程序中, 我们对 Point 进行特化, 首先定义了解析函数 fmt::formatter::parse(), 我们设想的 Point 类有 e / f 两种格式控制符, 然后定义了格式化函数 fmt::formatter::format() , 按照列别进行格式化并返回
自定义容器
fmt 对自定义容器的输出和格式化提供支持, 对于容器来说, 满足以下条件即可被格式化:
fmt 对容器内的所有类型均有支持
容器提供了 T::begin() 和 T::end() 成员函数以获得迭代器
#define FMT_HEADER_ONLY #include <fmt/core.h> #include <fmt/ranges.h> #include <iostream> #include <fmt/format.h> #include <vector> class IntVec { std::vector<int > vec; public : IntVec (std::initializer_list<int > list):vec (list){} auto begin () return vec.begin (); } auto end () return vec.end (); } }; int main () IntVec ivec{1 , 3 , 5 , 7 , 9 }; fmt::print ("{}\n" , ivec); }
假如我们利用自定义类型 Point 定义自定义容器 Graph
class Graph { std::vector<Point> pointVec; public : Graph (std::initializer_list<double > list){ for (auto iter = list.begin (); iter < list.end (); iter += 2 ){ pointVec.push_back (Point{*iter, *(iter + 1 )}); } } auto begin () return pointVec.begin (); } auto end () return pointVec.end (); } }; int main () Graph grf{1 , 2 , 3 , 4 , 5 , 6 }; fmt::print ("{}\n" , grf); }
文件输出
调用 cstdio 可以实现输出内容到文件
#define FMT_HEADER_ONLY #include <fmt/core.h> #include <vector> #include <cstdio> int main () std::vector<int > vec{1 , 2 , 3 , 4 }; std::FILE* file = std::fopen ("fmt.out" , "w" ); for (auto i:vec){ fmt::print (file, "Line {}\n" , i); } std::fclose (file); }
后记
目前还有很多东西无法在本地复现, 大多是因为环境配置和 fmt 的版本的问题, 目前就先这样吧 XD