学习了那么那么多(其实也就一点点)的 C++ 和 OOP 的思想, 不来点有意思的实战有什么意思呢? 正巧最近在B站冲浪的时候刷到一个宝藏视频合集, 介绍了从零开始的C++游戏开发, 于是跃跃欲试…
Day 8
在Re:从零开始的C++游戏开发中, 我们将所有代码都一股脑放在了main.cpp中, 即使通过封装和多态等方法加以组织, 依然在多次迭代后变成了史山. 所以, 我们首先要做的事情就是: 将这些内容分而治之
场景设计
为了将游戏内容分而治之, 我们需要将不同阶段的代码封装在不同的类中, 再把不同的类分布在不同的文件中, 以达到井然有序的文件组织结构.
上面所说的"不同阶段", 实际上就是场景
对于一个游戏, 我们可以将其理解为: 有玩家参与的一场演出, 演出的不同分镜就可以理解为场景, 特定的场景对应特定的剧本, 其余参与演出的所有对象, 都可以统称为GameObject, 无论是玩家, 敌人, 子弹还是道具等等, 本质上都属于GameObject, 由不同的场景和不同的剧本管理
游戏的主菜单, 玩家的角色选择界面, 游戏的局内表现地图, 统统都可以理解为场景. 因此我们可以定义基类Scene, 让上面三个场景分别继承这个基类, 实现不同的事件处理逻辑和绘图逻辑
在着手编写代码之前, 让我们拿回前情提要中, 游戏主循环框架的代码, 作为我们整个项目的开始…
启动 VS Code, 在main.cpp中输入以下代码
#include<graphics.h>

int main() {
    ExMessage msg;
    const int FPS = 60;

    initgraph(1280, 720);

    BeginBatchDraw();

    while (true) {
        DWORD frame_start_time = GetTickCount();

        while (peekmessage(&msg)) {

        }

        cleardevice();

        FlushBatchDraw();

        DWORD frame_end_time = GetTickCount();
        DWORD frame_delta_time = frame_end_time - frame_start_time;
        if (frame_delta_time < 1000 / FPS) {
            Sleep(1000 / FPS - frame_delta_time);
        }
    }
}
|
头文件规则
接下来, 新建项命名为scene.h作为所有场景类实现的头文件, 值得注意的是, 默认创建的头文件会有如下一行代码:
这个预处理宏的作用是防止同一个头文件被包含两次而导致二义性 / 重复引用:
在我们使用#include引用头文件时, 编译器会替我们将对应的头文件原封不动的"复制"到对应位置, 而且是纯粹的文本复制粘贴, 并不进行任何检查.
例如有两个头文件A.h和B.h, 其中B.h引用了A.h, 当我们在main.cpp中同时引用了A.h和B.h, main.cpp中就会包含一模一样的两份A.h, 这样就出现了错误.
对此我们有两种解决办法
第一种解决办法就是前文提到的利用语句#pragma once避免重复引用, 但是注意的是, 这个办法只针对 MSVC
另一种通用办法就是:
#ifndef _SCENE_H_
#define _SCENE_H_
#endif
|
这个方法会在头文件开始时检查一个特定的字符串有无被定义, 假如被定义过了, 说明在此之前自身已经被引用了一次, 所以接下来都无需复制, 直接跳转到#endif语句
这两种办法并没有优劣之分, 我们大可随意选择一种, 为了偷懒我就选择了第一种方法
明白了这一点, 我们就可以着手编写scene.h的代码了:
#pragma once

#include <graphics.h>

class Scene {
public:
    Scene() = default;
    ~Scene() = default;

    virtual void on_enter() {};
    virtual void on_update() {};
    virtual void on_draw() {};
    virtual void on_input(const ExMessage& msg) {};
    virtual void on_exit() {};

private:

};
|
在这个示例中, 我们将构造和析构函数定义为默认, 以提升代码的整洁性; 同时用虚函数声明一些通用的逻辑函数, 这样的虚函数使得Scene类成为一个多态类, 只用于构造子类的模板
场景子类
主菜单场景类
新建menu_scene.h, 按照scene.h构建代码
#pragma once

#include "scene.h"

class MenuScene :public Scene {
public:
    MenuScene() = default;
    ~MenuScene() = default;

private:
};
|
接下来重写对应的虚函数, 为了测试方便, 我们暂时先用控制台输出替代复杂的实现逻辑
void on_enter() override{
    std::cout << "Enter main menu" << std::endl;
};

void on_update() override{
    std::cout << "Main menu is running..." << std::endl;
};

void on_draw() override {
    outtextxy(10, 10, _T("Main menu draw content"));
};

void on_input(const ExMessage& msg) {};

void on_exit() override {
    std::cout << "Quit main menu" << std::endl;
};
|
回到main.cpp, 引入我们编写的头文件, 并在对应位置填入对应方法, 运行程序得到如下效果

假如没有出现控制台, 请修改初始化窗口函数语句为:
initgraph(1280, 720, EW_SHOWCONSOLE);
|
以显示对控制台默认的隐藏
游戏场景类
同理编写游戏场景类game_scene.h, 同样用控制台输出暂时替代复杂的逻辑
#pragma once

#include <iostream>
#include "scene.h"

class GameScene :public Scene {
public:
    GameScene() = default;
    ~GameScene() = default;

    void on_enter() override {
        std::cout << "Enter game menu" << std::endl;
    };

    void on_update() override {
        std::cout << "Game menu is running..." << std::endl;
    };

    void on_draw() override {
        outtextxy(10, 10, _T("Game menu draw content"));
    };

    void on_input(const ExMessage& msg) {};

    void on_exit() override {
        std::cout << "Quit game menu" << std::endl;
    };

private:
};
|
不要忘记在main.cpp中引入game_scene.h
场景管理器初步
我们已经有了两个逻辑上完整的场景类了, 接下来我们需要考虑实现场景间转换功能.
在现代游戏设计中, 我们一般用场景管理器作为切换场景的"导演"
有些同学可能会疑惑: 为什么我们的小项目需要使用到场景管理器这么复杂的概念?
实际上, 这就是软件工程中常说的架构意识, 一个程序如果在开发初期就有良好的架构, 在之后添加新功能, 定位 bug 和优化等方面就会十分方便, 反之, 一个混乱的架构会使这些工作事倍功半
Day 9
场景管理
场景管理器
由于场景的跳转本质上可以抽象为状态的转变, 因此场景管理器本质上就是一个状态机:
用户启动游戏进入的是主菜单, 接着选择角色, 开始游戏进入局内场景, 游戏结束后回到主菜单
我们可以定义枚举类型enum class SceneType来实现这个状态机的功能
#pragma once

#include "scene.h"

class SceneManager {
public:
    SceneManager() = default;
    ~SceneManager() = default;

    enum class SceneType {
        Menu = 0,
        Game
    };

    void set_current_scene(Scene* scene) {
        current_scene = scene;
        current_scene->on_enter();
    }

    void switch_to(SceneType type) {
        current_scene->on_exit();
        switch (type)
        {
        case SceneType::Menu:
            break;
        case SceneType::Game:
            break;
        default:
            break;
        }
        current_scene->on_enter();
    }

private:
    Scene* current_scene;
};
|
有的同学可能疑惑, 我们的on_enter和on_exit方法与构造和析构函数十分类似, 那为什么我们不直接使用构造函数呐?
构造函数和析构函数决定着场景对象在内存中的生命周期, 如果我们直接使用构造函数和析构函数执行进入和退出的逻辑, 势必会引起内存的多次加载和释放, 这并不是性能友好的行为; 此外, 在之后的扩展功能中, 我们可能需要让多个场景之间交换数据, 即场景内的成员对象的生命周期要长于场景本身, 假如直接使用构造函数和析构函数, 这部分逻辑将涉及很多内存管理的大坑
为了避免不必要的麻烦, 我们采取一种简明的设计思路: 在游戏开始时初始化所有场景对象, 游戏内部场景跳转只是重置新场景的状态, 而不是初始化新场景
回到main.cpp, 我们定义全局指针, 并在初始化阶段让他们指向对应的子场景类型实例
Scene* menu_scene = nullptr;
Scene* game_scene = nullptr;
|
如此, 我们就可以在scene_manager.h中通过extern关键字获取到这两个全局指针
extern Scene* menu_scene;
extern Scene* game_scene;
|
同时在switch_to函数中补全设置当前场景的逻辑
void switch_to(SceneType type) {
    current_scene->on_exit();
    switch (type)
    {
    case SceneType::Menu:
        current_scene = menu_scene;
        break;
    case SceneType::Game:
        current_scene = game_scene;
        break;
    default:
        break;
    }
    current_scene->on_enter();
}
|
最后, 补全场景管理器其余的逻辑, 并填写在main.cpp对应位置即可
场景跳转
补全menu_scene.h的on_input方法, 实现按下任意键时, 跳转到游戏场景
void on_input(const ExMessage& msg) {
    if (msg.message == WM_KEYDOWN) {
        scene_manager.switch_to(SceneManager::SceneType::Game);
    }
};
|
同理, 在game_scene.h的相同位置如法炮制, 即可实现向主菜单场景的跳转
玩家选择场景
除了主菜单场景和游戏场景, 我们还需要一个玩家选择场景selector_scene.h
重复相似于前面两个场景的步骤, 实现玩家选择场景
至此, 我们的游戏最核心的场景框架就搭建完成了, 之后几乎所有逻辑都将会在对应的场景类内实现; 此外, 我们可以利用 VS Code 筛选器功能, 调整头文件的结构

资源加载
在一周目, 我们设计了Atlas图集类和Animation动画类实现一个性能友好的帧动画播放器
图集类
仿照一周目, 我们编写图集类如下
#pragma once

#include <vector>
#include <graphics.h>

class Atlas {
public:
    Atlas() = default;
    ~Atlas() = default;

    void load_from_file(LPCTSTR path_template, int num) {
        img_list.clear();
        img_list.resize(num);

        TCHAR path_file[256];
        for (int i = 0; i < num; ++i) {
            _stprintf_s(path_file, path_template, i + 1);
            loadimage(&img_list[i], path_file);
        }
    }

private:
    std::vector<IMAGE> img_list;
};
|
此外, 我们还编写一些辅助方法来方便外部对类内部的使用
void clear() {
    img_list.clear();
}

size_t get_size() {
    return img_list.size();
}

IMAGE* get_image(int idx) {
    if (idx < 0 || idx >= img_list.size()) {
        return nullptr;
    }
    return &img_list[idx];
}

void add_image(const IMAGE& img) {
    img_list.push_back(img);
}
|
Day 10
素材水平翻转
在我们上一天编写的图集类中, 还缺少一个功能:
由于我们准备的素材一般只有朝右的, 所以我们需要手动将素材朝向左面; 然而这个操作其实是非常费时的, 因此我们考虑把这个操作放在游戏初始化阶段
首先新建一个util.h头文件用于储存一些工具函数, 置入图像水平翻转函数flip_image和图集翻转函数flip_atlas
inline void flip_image(IMAGE* src, IMAGE* dst) {
    int w = src->getwidth();
    int h = src->getheight();
    Resize(dst, w, h);
    DWORD* src_buffer = GetImageBuffer(src);
    DWORD* dst_buffer = GetImageBuffer(dst);

    for (int y = 0; y < h; ++y) {
        for (int x = 0; x < w; ++x) {
            int idx_src = y * w + x;
            int idx_dst = y * w + (w - x - 1);

            dst_buffer[idx_dst] = src_buffer[idx_src];
        }
    }
}

void flip_atlas(Atlas& src, Atlas dst) {
    dst.clear();

    for (int i = 0; i < dst.get_size(); ++i) {
        IMAGE img_flipped;
        flip_image(src.get_image(i), &img_flipped);
        dst.add_image(img_flipped);
    }
}
|
准备好这一切后, 便可以编写游戏素材资源导入函数load_game_resources
void load_game_resources() {
AddFontResourceEx(_T("assert/font/IPix.ttf"), FR_PRIVATE, NULL);
loadimage(&img_main_bg, _T("assert/image/main_bg.bmp"));
mciSendString(_T("open \"assert/sound/bgm.mp3\" alias bgm"), NULL, 0, NULL);
}
|
游戏资源加载主要分为字体加载, 图片资源加载和音效资源加载
动画类
接着就可以编写游戏的动画类Animation了
#pragma once

#include <graphics.h>
#include "atlas.h"
#include "util.h"

class Animation {
public:
    Animation() = default;
    ~Animation() = default;

    void reset() {
        timer = 0;
        idx_frame = 0;
    }

    void set_atlas(Atlas* new_atlas) {
        reset();
        atlas = new_atlas;
    }

    void set_loop(bool flag) {
        is_loop = flag;
    }

    void set_interval(int ms) {
        interval = ms;
    }

    int get_idx_frame() {
        return idx_frame;
    }

    IMAGE* get_frame() {
        return atlas->get_image(idx_frame);
    }

    bool check_finished() {
        if (is_loop) {
            return false;
        }
        else if (idx_frame == atlas->get_size() - 1) {
            return true;
        }
        else {
            return false;
        }
    }

    void on_update(int delta) {
        timer += delta;
        if (timer > interval) {
            timer = 0;
            idx_frame++;
            if (idx_frame >= atlas->get_size()) {
                if (is_loop) {
                    idx_frame = 0;
                }
                else {
                    idx_frame = atlas->get_size() - 1;
                }
            }
        }
    }

    void on_draw(int x, int y) const{
        putimage_alpha(x, y, atlas->get_image(idx_frame));
    }

private:
    int timer = 0;
    int interval = 0;
    int idx_frame = 0;
    bool is_loop = true;
    Atlas* atlas = nullptr;
};
|
#pragma comment(lib, "MSIMG32.LIB")

inline void putimage_alpha(int x, int y, IMAGE* img) {
    int w = img->getwidth();
    int h = img->getheight();

    AlphaBlend(GetImageHDC(GetWorkingImage()), x, y, w, h,
        GetImageHDC(img), 0, 0, w, h,
        { AC_SRC_OVER, 0, 255, AC_SRC_ALPHA });
}
|
接下来我们要思考一个常见的问题: 游戏中子弹命中后爆炸或敌人死亡的消失逻辑如何编写?
解决这个问题的关键就是: 如何延后存在消失动画的对象被删除的时间, 也就是说, 当敌人死亡时, 先播放敌人的消失动画, 动画播放结束后, 再从内存中释放敌人对象
在这里, 我们可以用一个优雅的方法–回调函数
我们只需要让敌人消失动画的函数保存在敌人对象内部, 再在敌人死亡前调用这个函数即可
修改Animation类如下:
class Animation {
public:
Animation() = default;
~Animation() = default;
void on_update(int delta) {
timer += delta;
if (timer > interval) {
timer = 0;
idx_frame++;
if (idx_frame >= atlas->get_size()) {
if (is_loop) {
idx_frame = 0;
}
else {
idx_frame = atlas->get_size() - 1;
}
if (is_loop == false && callback) {
callback();
}
}
}
}
void set_callback(std::function<void()> call_back) {
this->callback = call_back;
}
private:
std::function<void()> callback;
};
|
Day 11
在游戏设计行业, 有一个很著名的概念叫做"3C", 几乎囊括了游戏设计中三种最基本的元素
其中用于展示玩家视野即, 决定玩家观察游戏世界的元素就是摄像机, 摄像机能很好地提升玩家游玩游戏时的灵活性和自然感
窗口坐标系
根据牛顿运动定律: 物体的运动是相对的, 会随着参考系的变化而变化. 在游戏里也是同理, 角色的向前移动, 可以看作是整个场景的向后移动, 也就是说, 我们只需要保持角色在摄像机的位置不动, 移动整个场景, 就可以实现角色的移动
那么, 这就涉及到一个坐标检测的问题了
我们之前讨论的坐标系, 一般都是"窗口坐标系", 取值为 1280*720, 然而整个游戏世界可不止这么点大, 可能达到一个很恐怖的数字. 然而, 我们所有的逻辑坐标检测都应该放置在世界坐标系下, 只有当渲染的时候, 才会考虑窗口坐标系. 此时, 摄像机就可以理解为世界坐标系和窗口坐标系转化的媒介
考虑摄像机范围与窗口范围相等时, 我们可以推导出下面的公式:
窗口坐标=世界坐标−摄像机坐标
代码实现
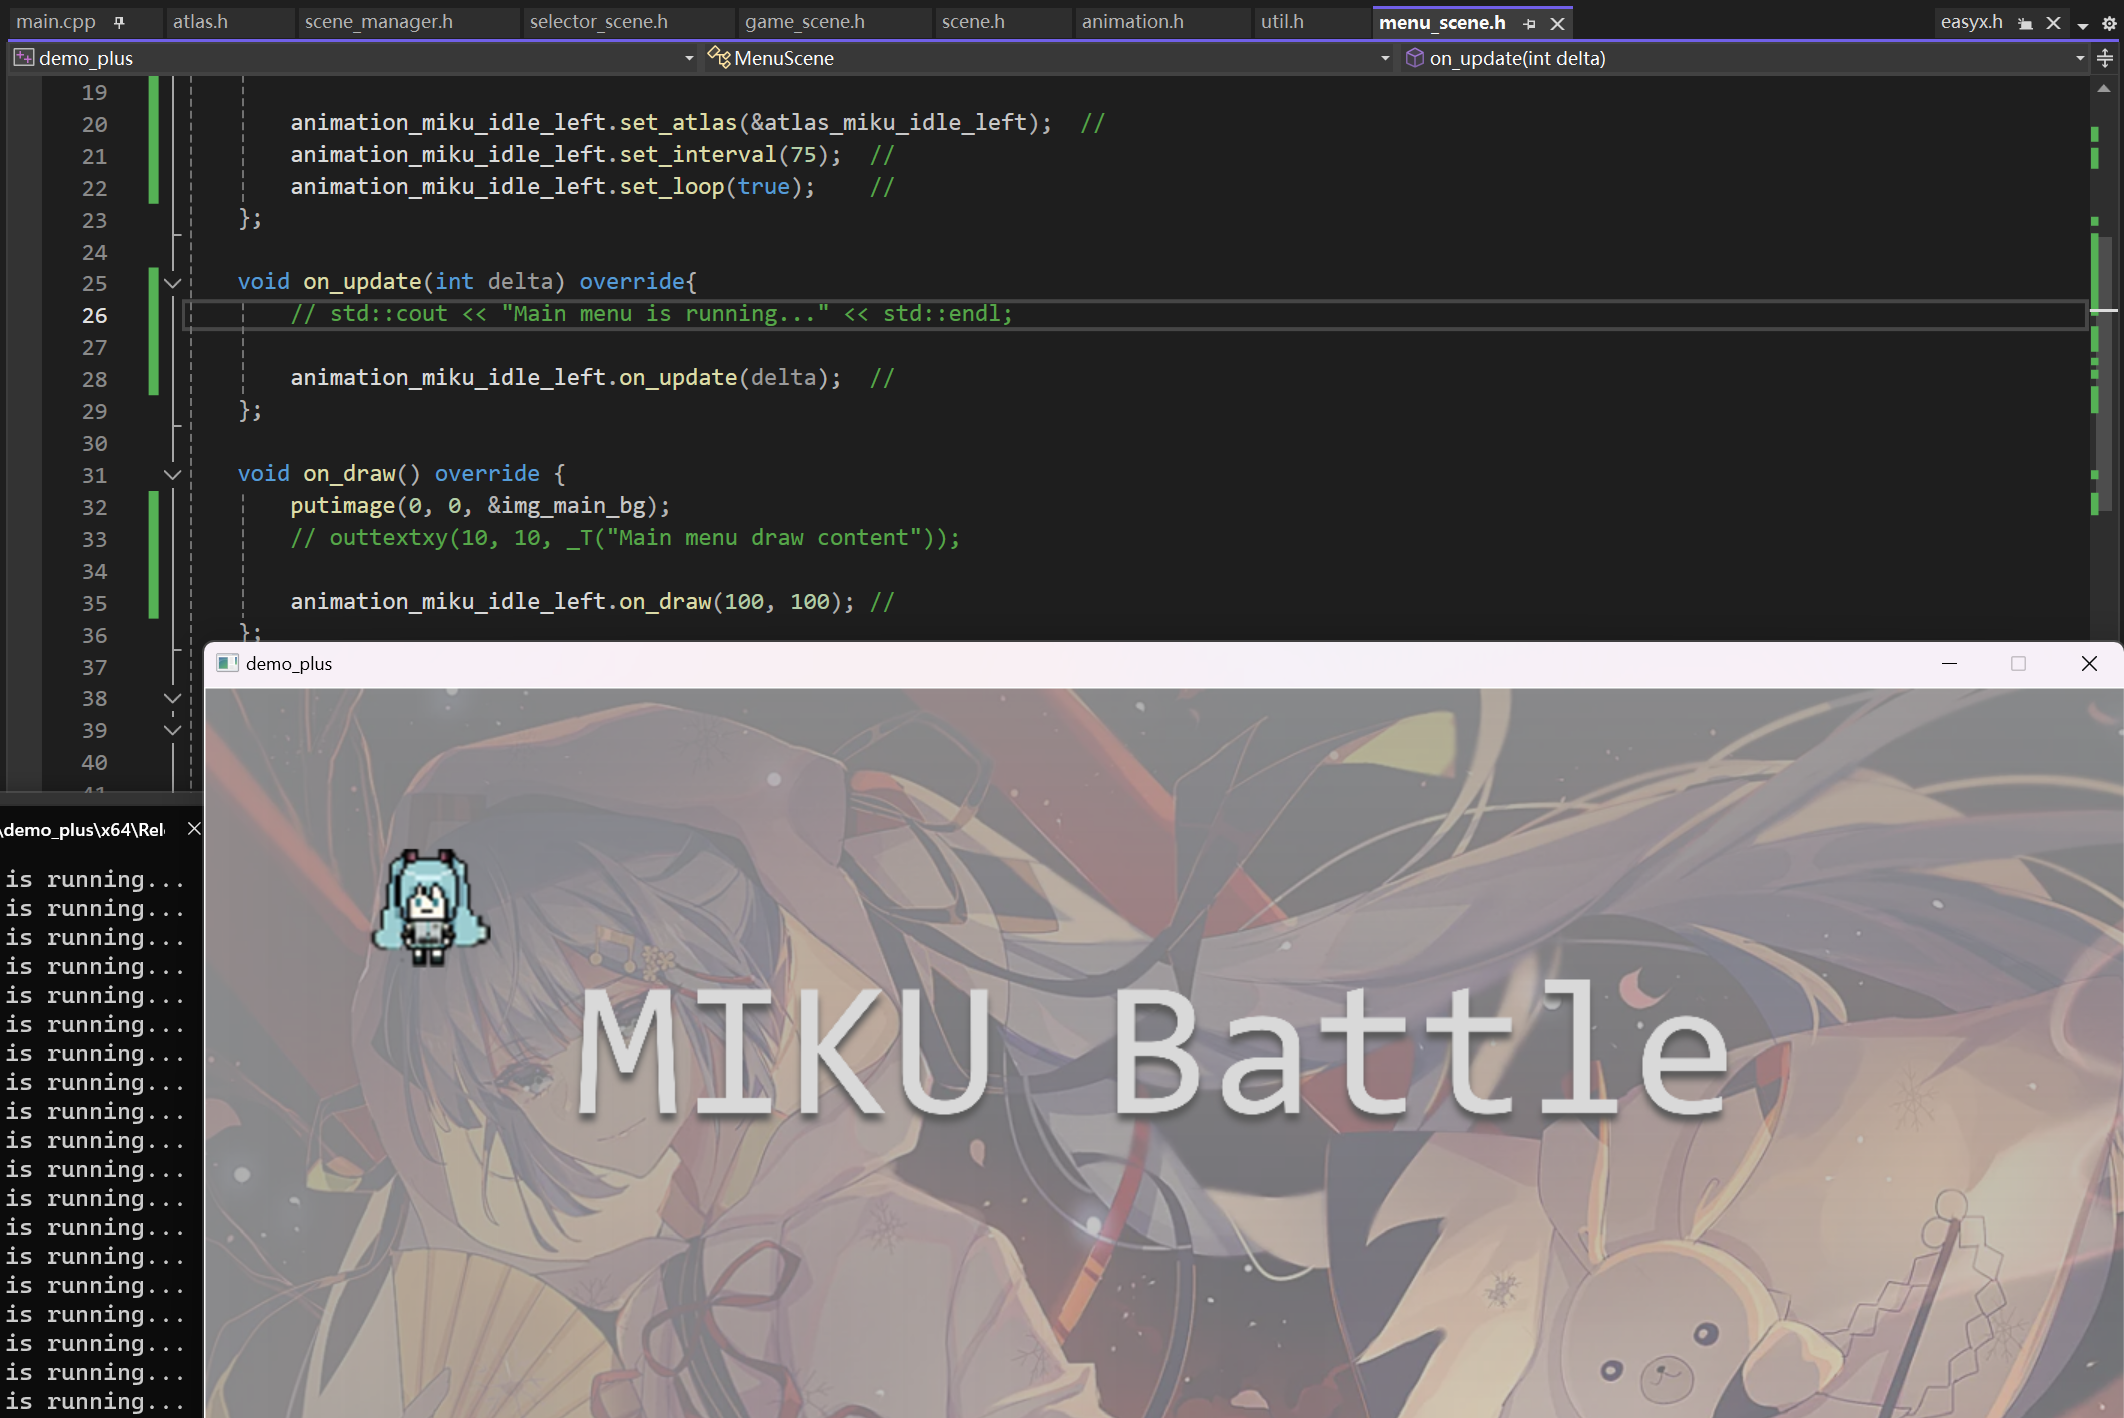
为了简单考虑, 我们在menu_scene.h中编写我们的测试代码
不要忘记标记你的测试语句, 因为这些语句之后是要删去的
首先导入图集atlas_miku_idle_left, 在menu_scene.h中编写私有成员动画animation_miku_idle_left, 并使其播放在(100, 100)处
测试成功后, 测试回调函数, 修改如下:
void on_enter() override{
animation_miku_idle_left.set_atlas(&atlas_miku_idle_left);
animation_miku_idle_left.set_interval(75);
animation_miku_idle_left.set_loop(false);
animation_miku_idle_left.set_callback(
[]() {
scene_manager.switch_to(SceneManager::SceneType::Game);
}
);
};
|
调试后发现, 播放完动画后, 场景立即跳转到了游戏场景, 这说明我们的回调函数是正常工作的
摄像机实现
二维向量
当然, 我们可以用POINT类记录摄像机的位置, 但是为了更加精细的控制摄像机的位置, 我们可以定义一个游戏设计中常见的二维向量类Vector2, 并使其支持基本的加减, 数乘和点乘以及取模, 标准化操作
#pragma once

#include <cmath>

struct Vector2 {
    Vector2() = default;
    ~Vector2() = default;

    Vector2(float x, float y) :x(x), y(y) {};

    Vector2 operator+(const Vector2& vec) const {
        return Vector2(x + vec.x, y + vec.y);
    }

    Vector2 operator-(const Vector2& vec) const {
        return Vector2(x - vec.x, y - vec.y);
    }

    float operator*(const Vector2& vec) const {
        return x * vec.x + y * vec.y;
    }

    void operator+=(const Vector2& vec) {
        x += vec.x;
        y += vec.y;
    }

    void operator-=(const Vector2& vec) {
        x -= vec.x;
        y -= vec.y;
    }

    Vector2 operator*(float val) const {
        return Vector2(val * x, val * y);
    }

    void operator*=(float val) {
        x *= val;
        y *= val;
    }

    float length() {
        return sqrt(x * x + y * y);
    }

    Vector2 normalize() {
        float len = length();

        if (len == 0) {
            return Vector2(0, 0);
        }
        else {
            return Vector2(x / len, y / len);
        }
    }

    float x = 0;
    float y = 0;
};
|
摄像机类
#pragma once

#include "vector2.h"

class Camera {
public:
    Camera() = default;
    ~Camera() = default;

    const Vector2& get_position() const {
        return position;
    }

    void reset() {
        position.x = 0;
        position.y = 0;
    }

    void on_update(int delta) {

    }

private:
    Vector2 position;
};
|
Day 12
在游戏设计中, 当我们想要表达"爆炸"“射击”"冲击波"或是"惊恐震撼"的时候, 我们常常会使用窗口抖动效果, 接下来我们就尝试实现窗口抖动效果
通用定时器
窗口抖动特效, 我们可以理解为一个有时限的buff, 那么我们需要在窗口抖动开始后一定时间结束这个buff, 所以我们需要一个定时器以控制抖动开始和结束的时间
同时, 我们考虑到很多游戏元素, 比如buff, 技能效果, CD等, 都与"时间"有关系, 因此干脆实现一个通用的计时器
我们倾向于用回调函数而不是继承的方法实现
#pragma once

#include <functional>

class Timer {
public:
    Timer() = default;
    ~Timer() = default;

    void restart() {
        pass_time = 0;
        shotted = false;
    }

    void set_wait_time(int val) {
        wait_time = val;
    }

    void set_one_shoot(bool flag) {
        one_shoot = flag;
    }

    void set_callback(std::function<void()> callback) {
        this->callback = callback;
    }

    void pause() {
        paused = true;
    }

    void resume() {
        paused = false;
    }

    void on_update(int delta) {
        if (paused) {
            return;
        }
        else {
            pass_time += delta;

            if (pass_time > wait_time) {
                if (
                    callback &&
                    (
                        !one_shoot ||
                        (
                            one_shoot && !shotted
                            )
                        )
                    ) {
                    callback();
                }

                shotted = true;
                pass_time = 0;
            }
        }
    }

private:
    int pass_time = 0;
    int wait_time = 0;
    bool paused = false;
    bool shotted = false;
    bool one_shoot = false;
    std::function<void()> callback;
};
|
抖动特效
摄像机抖动
一种办法是通过噪声实现平滑的随机抖动, 但是这种方法并不经济, 我们考虑最直接的随机数
#pragma once
#include "vector2.h"
#include "timer.h"
class Camera {
public:
Camera() {
tmr_shake.set_one_shoot(false);
tmr_shake.set_callback(
[&]() {
is_shaking = false;
reset();
}
);
}
void on_update(int delta) {
tmr_shake.on_update(delta);
if (is_shaking) {
position.x = (-50 + rand() % 100) / 50.0f * shaking_strength;
position.y = (-50 + rand() % 100) / 50.0f * shaking_strength;
}
}
void shake(float strength, int duration) {
is_shaking = true;
shaking_strength = strength;
tmr_shake.set_wait_time(duration);
tmr_shake.restart();
}
private:
Vector2 position;
Timer tmr_shake;
bool is_shaking = false;
float shaking_strength = 0;
};
|
Day 13
接下来, 我们开始逐个场景的实现游戏逻辑
首先, 删除所有测试代码(也就是带有//标记的代码)
主菜单场景
与更新间隔delta类似, 摄像机camera也应该是场景间共享的资源, 我们考虑对on_draw进行修改
virtual void on_draw(const Camera& camera) {};
|
同时修改所有其他涉及的方法(此时override关键字的作用就体现了)
#pragma once

#include <iostream>
#include "scene.h"
#include "scene_manager.h"
#include "animation.h"
#include "camera.h"
#include "timer.h"

#pragma comment(lib, "Winmm.lib")

extern SceneManager scene_manager;
extern IMAGE img_menu_bg;

class MenuScene :public Scene {
public:
    MenuScene() = default;
    ~MenuScene() = default;

    void on_enter() override{
        mciSendString(_T("play bgm repeat from 0"), NULL, 0, NULL);
    };

    void on_update(int delta) override{
    };

    void on_draw(const Camera& camera) override {
        putimage(0, 0, &img_menu_bg);
    };

    void on_input(const ExMessage& msg) {

        if (msg.message == WM_KEYDOWN) {
            mciSendString(_T("play ui_confirm from 0"), NULL, 0, NULL);
            scene_manager.switch_to(SceneManager::SceneType::Selector);
        }
    };

    void on_exit() override {
    };

private:
};
|
角色选择场景
#pragma once

#include <iostream>
#include "scene.h"
#include "scene_manager.h"
#include "animation.h"

extern SceneManager scene_manager;
extern IMAGE img_selector_bg;
extern IMAGE img_selector_btn_idle_right;
extern IMAGE img_selector_btn_idle_left;
extern IMAGE img_selector_btn_down_right;
extern IMAGE img_selector_btn_down_left;
extern Atlas atlas_miku_idle_right;

class SelectorScene :public Scene {
public:
    SelectorScene() = default;
    ~SelectorScene() = default;

    void on_enter() override {
        animation_miku.set_atlas(&atlas_miku_idle_right);
        animation_miku.set_interval(100);

        int x = getwidth();
        int y = getheight();

        pos_img_1P.x = 243;
        pos_img_1P.y = 307;

        pos_img_2P.x = 903;
        pos_img_2P.y = 307;

        pos_1P_selector_btn_left.x =
            pos_img_1P.x - img_selector_btn_idle_left.getwidth();
        pos_1P_selector_btn_left.y =
            pos_img_1P.y + 48 - img_selector_btn_idle_left.getheight() / 2;

        pos_1P_selector_btn_right.x = pos_img_1P.x + 96;
        pos_1P_selector_btn_right.y = pos_1P_selector_btn_left.y;

        pos_2P_selector_btn_left.x =
            pos_img_2P.x - img_selector_btn_idle_left.getwidth();
        pos_2P_selector_btn_left.y = pos_1P_selector_btn_left.y;

        pos_2P_selector_btn_right.x = pos_img_2P.x + 96;
        pos_2P_selector_btn_right.y = pos_1P_selector_btn_left.y;

    };

    void on_update(int delta) override {
    };

    void on_draw(const Camera& camera) override {
        putimage(0, 0, &img_selector_bg);
    };

    void on_input(const ExMessage& msg) {
        if (msg.message == WM_KEYDOWN) {
            scene_manager.switch_to(SceneManager::SceneType::Menu);
        }
    };

    void on_exit() override {
    };

private:
    POINT pos_1P_selector_btn_left = { 0 };
    POINT pos_1P_selector_btn_right = { 0 };
    POINT pos_2P_selector_btn_left = { 0 };
    POINT pos_2P_selector_btn_right = { 0 };

    POINT pos_img_1P = { 0 };
    POINT pos_img_2P = { 0 };
    POINT pos_1P_name = { 0 };
    POINT pos_2P_name = { 0 };

    Animation animation_miku;
};
|